If you have just installed Dolphin Smalltalk then you can follow this guided tour of the development system to bring yourself rapidly up to speed. In general, we'll assume that you are familiar with the Smalltalk language (if not then see the note below) and that you have used another Smalltalk development environment in the past. You'll find that the Dolphin development tools are easy-to-use and highly integrated with the Windows operating system, employing the latest native widgets (controls) throughout. Dolphin has the look and feel of a truly modern environment and we hope that this will provide you with the freedom of expression that you expect from Smalltalk.
Most of all - make sure you have fun!
This tour does not attempt to teach you about the Smalltalk language. If you are new to the language then you should leave off here and start with the Beginners Guide to Dolphin Smalltalk in the Education Centre. This can be reached from the Help/Education Centre menu command in any of the Dolphin tools. By the time you complete the beginners guide you will know most of the information that is available in this tour but you can still pop back and use these pages as reference material.
By now you will have installed Dolphin Smalltalk onto your computer. If you take a look at the installation directory you will find the following files.
The following directories contain Dolphin Package files (PACs) that can be installed into your image using the Package Browser. Many packages contain brief instructions on how to use their contents the package comment.
A number of files are also installed into the Windows system directory.
The installation program will have created a program folder containing the Dolphin icon. To start Dolphin, either double-click this icon, or double-click on the image file in the Windows Explorer.
If you intend to use Dolphin seriously, you must register it. Depending on which version you have, one of the following restrictions will exist in an un-registered copy:
Don't worry, though. Providing you have an Internet connection then registration is FREE. Simply go to the Dolphin registration web page at: http://www.object-arts.com/Registration.htm and follow the instructions to immediately receive your password to unlock the system. You will need to provide, amongst other things, a username of your choice and the imagecode that is allocated to you in the "Locked Image" dialog.
Since registration is free, it's best that you register your copy right away. If you have one of the Dolphin versions that is not initially disabled then you can still choose to register it early by using the Tools/Options/Register now menu command. This will bring up the "Locked Image" dialog and you can then follow the instructions above to register.
Once you have started Dolphin (and hopefully unlocked the image) you will be presented with two windows, a System Transcript and a Workspace.
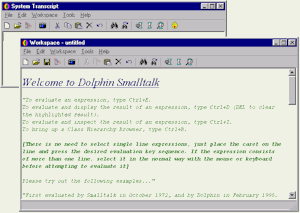
The Workspace window contains some further instructions and some interesting experiments to try out and we suggest that you run through these now to get an insight into the interactive nature of the development environment. This is what Smalltalk is all about; dynamically interacting with objects.
Tip: you can execute a piece of code on a single line by placing the cursor on the line and typing Ctrl+E (for Workspace/Evaluate It). Some code expressions return an answer and you can execute these and display the answer by typing Ctrl+D (for Workspace/Display It). If some code spans more than one line then you must select the appropriate lines of text before evaluating it.
Tip: if you make a mistake, you may bring up a Walkback window. To the uninitiated this may appear as a message box filled with hieroglyphics and decorated with an Exclamation icon. Don't panic! Ffor now just press the Terminate button and carry on.
You can quit the system from any of the development tools by choosing the File/Exit Dolphin command from the menu bar. You will be prompted to see if you wish to save your development image, and normally you should do so, unless you have made some changes that you really wish to lose. Saving the image will take a snapshot of your current situation so that it will be restored exactly next time you start Dolphin.
The Dolphin environment provides a number of integrated tools that you'll use continually when developing Smalltalk code. The Tools menu in each of the development windows provides access to most of the tools. You may now like to follow the following descriptions in order or come back to them later. You can also reference the following pages by pressing F1 for help in any of the development tools.
Workspace
Transcript
Package Browser
Class Hierarchy Browser
Resource Browser
View Composer
The following system tools are not available from the Tools menu but will appear during the course of your work with Dolphin.
Method Browser
Inspector
Walkback
Debugger
One thing that is unique about Smalltalk when compared with other software development tools, is that you are constantly working with a "sea" of objects that contains, not only those objects that are part of your application, but also those objects that form the entire development system. Virtually everything is exposed to you. You may modify any of these objects and their behavior in anyway you like. This is naturally very powerful since you can easily tailor any of the development tools to your own requirements and you can even build and integrate new tools completely into the environment. However, it can also be a dangerous situation. You may make a change to one of the base classes, for example, which breaks it in such a way that the development tools no longer operate correctly.
The best thing to do if this happens is to exit Dolphin without saving the broken image and to restart with the last known good image that you saved. Obviously, you will have to re-apply any changes you made in the interim period between previously saving the image and making the change that recently broke it. If you open a copy of the change log (Dolphin.chg) and go to the bottom of the file you should be able to locate and re-apply the lost changes. Note that Dolphin marks each image save with a comment in the change log so you need to page up from the bottom until you find this and then apply all the changes from this point to the end of the file. Obviously, if you save your image frequently then there'll be less work to do when recovering from a crash.
Save your image often; at least once an hour.
There is always the chance that you may inadvertently save down an image that has in some way been corrupted. In this case it is important that you have a complete backup copy to fall back on.
We would recommend taking a full backup of your image at least daily.
When making such a backup you MUST save the following three files together.
Image (Dolphin.img)
Changes (Dolphin.chg)
Sources (Dolphin.sml)
Although the change log (CHG) and the sources file (SML) contain source text you must NEVER modify and save down changes to these files. The Dolphin image gains access to its source code by maintaining pointers into these files. If you modify them then the pointers will become invalid and you will no longer be able to see the source code correctly. It is for this same reason that the Image/Changes/Sources files must always be backed up together.