The Class Hierarchy Browser is where you will develop most of your Smalltalk code. But, as its name suggests, it also provides a great means of browsing all of the existing source code in your image. Combined with its close integration with the other development tools (particularly the Method Browser) it is a great learning aid.
A new Class Hierarchy Browser can be opened from the Tools/Class Hierarchy Browser menu command or by pressing the Browser Classes toolbar button.
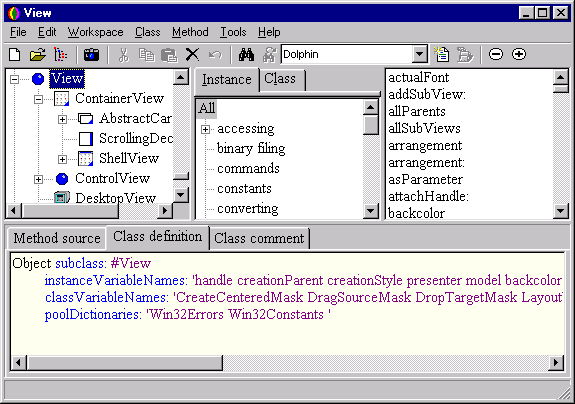
The Classes pane at top left displays the class inheritance hierarchy. Selecting a class in here will display a list of it's methods in the Methods pane at far right. By choosing either the Class or Instance tab you will be able to indicate whether the class or instance methods are displayed. As a class is selected, the Smalltalk code for its definition will be displayed in the Class definition pane at the bottom of the Browser. If you wish to change the class definition, you can edit it here and commit the changes using Workspace/Accept.
Tip: Ctrl+S is a faster shortcut for Workspace/Accept
Tip: remember that if you are modifying classes with instances then all the instances will be mutated to the format of a new class definition. This may cause unexpected results if you are not careful. In particular, avoid changing any of the class definitions for the base classes involved in the development system unless you are confident that you know what you are doing. In any case, it is sensible to save your image before making any potentially dangerous changes.
The central Categories pane shows the method categories to which the displayed methods belong. By a selecting a category here you can filter which methods are displayed in the Methods pane. Choosing All will remove the filter and display all methods.
As a method is selected in the Methods pane, its source code is displayed, with syntax coloring, in the lower Method source pane. You can edit the method's source here and commit the changes using Workspace/Accept or Ctrl+S.
You can display the comment text for a class by clicking on the Class comment tab. Once again, you can edit the text here and accept the changes with Workspace/Accept.
The Packages drop-down list in the toolbar displays the owning package for the currently selected class or method in the browser. You can attempt to move it to another package by selecting from the list and you will be asked to confirm this operation.
In order to create a new class, first select an appropriate superclass in the Classes hierarchy. Then choose Class/New and enter a suitable class name into the prompter that appears. Note that, since classes are added to the Smalltalk global dictionary, they must comply with the rules for a global name (i.e. they must begin with a capital letter and contain no special symbols) and they must not already exist as a global in that dictionary. The new class will be created and selected in the browser. The class definition will be displayed in the Class definition pane and at this stage you should modify this to add any instance or class variables that you require. Remember to accept the changes you make with Workspace/Accept.
If you wish to move the class to a particular package then this can be done, either by dragging it from the Classes pane and dropping it over a package in the Package Browser, or by using the Packages drop-down in the toolbar.
Tip: if you are creating many new classes then you can set a default package into which all of these will be added. Use Class/Default Package to do this.
You can now proceed to add the method definitions for the new class.
If you have not already done so, select the appropriate class to which the method should be added. You must also decide whether this is to be a class or instance method and choose the Class or Instance tab respectively. Now use the Method/New command. This will transfer input focus to an empty Method source pane where you can enter text for your new method. Note that the syntax coloring only takes place when you compile the method using Workspace/Accept.
Tip: if you make an error in your method source then the compilation will fail and an error message will be reported in the status bar at the bottom of the browser. The method source will be displayed in red to further highlight that there is a problem.
There are around 10,000 methods in the basic Dolphin development image. The fact that each is assigned to one or more categories makes it easier to navigate the system and understand the method's purpose. It is therefore important that you should categorize your own methods in the same way. Here are the ways in which you can do this:
Use Class/Find to bring up a prompter for the class name to find. You can either enter a complete name or a wild-card specification. When the class you want has been located it is made the current class in the browser.
The Class Hierarchy Browser supports a number of very useful browsing operations. All of these bring up a Method Browser displaying a list of methods that conform to the browse requested. The operations are available either from the Class or Method pull down menus or from the context menus in the Classes, Methods or Method source panes
Class/Inst Var Refs -- brings up a list of the instance variables for the selected class. Choose a variable to browse a list of all the methods that reference it.
Class/Class Var Refs -- brings up a list of the class variables for the selected class. Choose a variable to browse a list of all the methods that reference it.
Class/References -- browse a list of all the methods that reference the selected class.
Methods/Browse/Definitions -- browse a list of all the methods in the system that are defined with the same selector as the currently selected method in the browser.
Methods/Browse/References -- browse a list of all the methods in the system that reference the selector of the current method. Note that this only shows methods that reference the same symbolbut this might not be used as part of an actual message send.
Methods/Browse/Messages -- brings up a list of all of the symbols contained in the current method. Choose a symbol to browse a list of all of the methods defined with this as their selector.
Methods/Browse/Containing text -- brings up a prompter for a text string. Enter an appropriate string to browse a list of all of the methods that contain this text as part of their method source.
Methods/Browse/Category -- brings up a category prompter. Choose a category to browse a list of all of the methods contained in that category.
Methods/Browse/All changed -- browse a list of all the methods in the system that have been changed. Note that the changed flag for a method is set when the method is compiled and is reset if the method is filed out to an external source file (either by using Class/File out, or by saving the package that contains the method).
Methods/Browse/Compilation failures -- browse a list of all the methods in the system that, for some reason, failed to compile.
Tip: methods that failed to compile are in fact instances of CompileFailedMethod. Not all compilation failures create such methods. In general, they are only created when a method is filed in as part of a batch process such as package installation. A compilation failure in the Class Hierarchy Browser will not create a CompileFailedMethod.
The context menu for the Classes pane offers two commands that allow you to bring up a View Composer onto a particular View resource for the chosen class.