By now you'll want to try some experiments that produce graphical results. That's what this first tutorial is about; to open some windows and draw in them.
In Dolphin, windows are represented by subclasses of View. For example, a top-level window will be an instance of the class ShellView. Let's open a ShellView and play around.
w := ShellView new show.
Evaluate this in a Workspace. A new workspace local variable will be created to hold a new ShellView window.
A window will appear on your desktop and we can use the variable, w, to talk to it. Open a Class Hierarchy Browser and find the View class; you can use the Class/Find command to do this. Select the geometry category to filter only those methods concerned with manipulation of a window's geometry. You'll see that there are methods to position a view and to change its extent. Try evaluating the following statements individually:
w position: 0@0.
w extent: 250@150.
w height: 200.
w x: 60.
In order to draw on a window, you need to ask for its canvas. All drawing operations are performed on a canvas; if you are a Windows programmer you'll recognise this as being equivalent to a Device Context. To ask for a drawing canvas send the #canvas message to any View. This returns an instance of the Canvas class. If you locate this within the Class Hierarchy Browser you can see the operations available for painting on a canvas. Try evaluating:
w canvas ellipse: (Rectangle origin: 0@0 extent: 250@150).
w canvas text: 'Hello from Dolphin' at: 50@50.
Don't worry, at this stage we don't expect the ellipse to quite fill the window; we'll deal with that later.
Try the ellipse again but this time changing the border and fill colours. This is done by setting the pen and brush of the canvas respectively. Evaluate the following cascaded sequence::
w canvas
	pen: Pen red;
	brush: Brush gray;
	ellipse: (Rectangle origin: 0@0 extent: 250@150)
You might like to further investigate the Pen and Brush classes in the browser to see how to create instances with other colours, widths and fill styles etc.
Notice that if you minimize and restore your window, or otherwise cause it to be repainted, then the result of all that hard drawing effort vanishes. We'll see how to add some permanence to this in just a moment.
We want to create a new type of window with some additional behaviour, that is, to paint an ellipse and a "Hello" greeting as its contents. In Smalltalk, to add new behaviour you create a new subclass of an existing class. We'll want our new window, once again, to be a top level window. So we need to inherit the behaviour of the ShellView class. Let's create a subclass of ShellView.
ShellView subclass: #Greeting
instanceVariableNames: ''
classVariableNames: ''
poolDictionaries: ''
Tip: You can either evaluate the above statement directly to create the class or, more easily, you can use the Class/New command in the Class Hierarchy Browser. Using the latter, just enter the class name (Greeting) into the prompter that appears and the definition will be automatically generated for you.
Once a class has been created you can immediately instantiate an instance of it.
w := Greeting new show.
Obviously the window looks identical to a standard ShellView. Now we need to add a additional behaviour.
Each time that an area of a window is exposed, Windows sends a WM_PAINT message to that window asking for the area to be repainted. Dolphin maps the WM_PAINT message to an onPaintRequired: method that can be overridden in any View subclass. Let's copy the code we experimented with before into an onPaintRequired: method for Greeting.
Tip: Use Method/New in the browser to create a space for the new method. Type (or copy) in the code and choose Workspace/Accept to compile it.
onPaintRequired: aPaintEvent
	"A portion of the receiver window has been exposed and needs repainting.
	The supplied aPaintEvent holds details about the exposed area.
	Within #onPaintRequired: you MUST ask for a Canvas from aPaintEvent
	(not the receiver window) to paint the contents on."

	| canvas |
	canvas := aPaintEvent canvas.
	canvas
		pen: Pen red;
		brush: Brush gray;
		ellipse: (Rectangle origin: 0@0 extent: 250@150);
		text: 'Hello from Dolphin' at: 50@50.
If the compilation is successful, the code immediately becomes active without any need to restart the application. As soon as you cause your Greeting window to be repainted the onPaintRequired: method will be executed.
We could make our message somewhat more flexible if it resized as the window size was changed. Basically this means changing the onPaintRequired: handler (and we can jazz it up slightly at the same time) but it also requires that we intercept Windows' WM_SIZE message routed by Dolphin to an onResized: method.
onResized: aSizeEvent
	"The receiver has been resized.
	Force a repaint of the entire client area. We need to do this
	in cases where changing the extent of a View alters the way in
	which it is painted (rather than just the area that is repainted)"

	self invalidate.
	^super onResized: aSizeEvent.
In order to make use of this we need to modify the #onPaintRequired: method once again.
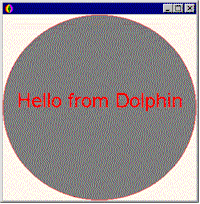
onPaintRequired: aPaintEvent
	"A portion of the receiver window has been exposed and needs repainting.
	The supplied aPaintEvent holds details about the exposed area.
	Within #onPaintRequired: you MUST ask for a Canvas from aPaintEvent
	(not the receiver window) to paint the contents on."

	| canvas box textbox |
	box := self clientRectangle.
	canvas := aPaintEvent canvas.
	canvas
		pen: Pen red;
		brush: Brush gray;
		ellipse: box;
		font: (Font name: 'Arial' pointSize: 24);
		setTextAlign: TA_CENTER | TA_BASELINE;
		setBkMode: TRANSPARENT;
		setTextColor: Color red;
		text: 'Hello from Dolphin' at: box center.
With luck your greeting will appear as below:
Click here to move on to the next tutorial.