When creating an application, you'll want to put more than one widget
inside a window. Our first helloworld example only used one widget
so we could simply use a gtk_container_add()
call to pack the widget into the window. But when you want to put
more than one widget into a window, how do you control where that widget is
positioned? This is where packing comes in.
Most packing is done by creating boxes. These are invisible widget containers that we can pack our widgets into which come in two forms, a horizontal box, and a vertical box. When packing widgets into a horizontal box, the objects are inserted horizontally from left to right or right to left depending on the call used. In a vertical box, widgets are packed from top to bottom or vice versa. You may use any combination of boxes inside or beside other boxes to create the desired effect.
To create a new horizontal box, we use a call to
gtk_hbox_new(), and for vertical boxes,
gtk_vbox_new. The
gtk_box_pack_start() and
gtk_box_pack_end() functions are used to place
objects inside of these containers. The
gtk_box_pack_start() function will start at
the top and work its way down in a vbox, and pack left to right
in an hbox. gtk_box_pack_end()
will do the opposite, packing from bottom to top in a vbox,
and right to left in an hbox. Using these functions allows us
to right justify or left justify our widgets and may be mixed in any way
to achieve the desired effect. We will use
gtk_box_pack_start() in most of our examples.
An object may be another container or a widget. In fact, many widgets
are actually containers themselves, including the button, but we usually
only use a label inside a button.
By using these calls, GTK knows where you want to place your widgets so it can do automatic resizing and other nifty things. There are also a number of options as to how your widgets should be packed. As you can imagine, this method gives us a quite a bit of flexibility when placing and creating widgets.
Because of this flexibility, packing boxes in GTK can be confusing at first. There are a lot of options, and it's not immediately obvious how they all fit together. In the end, however, there are basically five different styles.
Each line contains one horizontal box (hbox) with several buttons.
The call to gtk_box_pack() is shorthand for
the call to pack each of the buttons into the hbox. Each of
the buttons is packed into the hbox the same way (i.e., same arguments
to the gtk_box_pack_start() function).
This is the declaration of the
gtk_box_pack_start() function.
procedure gtk_box_pack_start (box : PGtkBox;
                              child : PGtkWidget;
                              expand : gboolean;
                              fill : gboolean;
                              padding : gint);
The first argument is the box you are packing the object into, the second is the object. The objects will all be buttons for now, so we'll be packing buttons into boxes.
The expand argument to gtk_box_pack_start()
and gtk_box_pack_end() controls whether
the widgets are laid out in the box to fill in all the extra space
in the box so the box is expanded to fill the area allotted to it
(true); or the box is shrunk to just fit
the widgets (false). Setting expand
to false will allow you to do right and
left justification of your widgets. Otherwise, they will all expand
to fit into the box, and the same effect could be achieved by using
only one of gtk_box_pack_start()
or gtk_box_pack_end().
The fill argument to the gtk_box_pack
functions controls whether the extra space is allocated to the objects
themselves (true), or as extra padding
in the box around these objects (false).
It only has an effect if the expand argument is also
true.
When creating a new box, the function looks like this:
function gtk_hbox_new (homogeneous : gboolean;
                       spacing : gint) : PGtkWidget;
The homogeneous argument to gtk_hbox_new()
(and the same for gtk_vbox_new()) controls
whether each object in the box has the same size (i.e., the same width
in an hbox, or the same height in a vbox). If it is set,
the gtk_box_pack routines function essentially
as if the expand argument was always turned on.
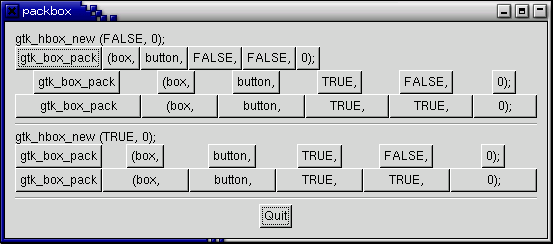
What's the difference between spacing (set when the box is created) and padding (set when elements are packed)? Spacing is added between objects, and padding is added on either side of an object. The following figure should make it clearer:

Here is the code used to create the above images. I've commented it fairly heavily so I hope you won't have any problems following it. Compile it yourself and play with it.
program packbox;

uses gtk2, gdk2, glib2, sysutils;

function delete_event (widget : PGtkWidget; event : PGdkEvent;
                       data : gpointer) : gboolean; cdecl;
begin
   gtk_main_quit();
   delete_event := false;
end;

{ Make a new hbox filled with button-labels.  Arguments for the variables
  we're interested are passed in to this function.  We do not show the box,
  but do show everything inside.}

function make_box (homogeneous : boolean; spacing : Longint; expand : boolean;
                   fill : boolean; padding : Longint) : PGtkWidget; cdecl;
var
   box, button : PGtkWidget;
   PadStr      : String;
   PPadStr     : pchar;
begin
   { Create a new hbox with the appropriate homogeneous and spacing settings }
   box := gtk_hbox_new(homogeneous, spacing);

   { Create a series of buttons with the appropriate settings }
   button := gtk_button_new_with_label('gtk_box_pack');
   gtk_box_pack_start(GTK_BOX(box), button, expand, fill, padding);
   gtk_widget_show(button);

   button := gtk_button_new_with_label('(box,');
   gtk_box_pack_start(GTK_BOX(box), button, expand, fill, padding);
   gtk_widget_show(button);

   button := gtk_button_new_with_label('button,');
   gtk_box_pack_start(GTK_BOX(box), button, expand, fill, padding);
   gtk_widget_show(button);

   { Create a button with the label depending on the value of expand. }
   if expand = true then
      button := gtk_button_new_with_label('TRUE,')
   else
      button := gtk_button_new_with_label('FALSE,');

   gtk_box_pack_start(GTK_BOX(box), button, expand, fill, padding);
   gtk_widget_show(button);

   { This is the same as the button creation for "expand" above,
     but uses the shorthand form (but not in Pascal). }
   if fill then
      button := gtk_button_new_with_label('TRUE')
   else
      button := gtk_button_new_with_label('FALSE');
   gtk_box_pack_start(GTK_BOX(Box), button, expand, fill, padding);
   gtk_widget_show(button);

   PadStr := IntToStr(Padding) + ');';
   PPadStr := StrAlloc(Length(PadStr) + 1);
   StrPCopy(PPadStr, PadStr);

   button := gtk_button_new_with_label(PPadStr);
   gtk_box_pack_start(GTK_BOX(box), button, expand, fill, padding);
   gtk_widget_show(button);

   make_box := box;
end;

var
   window, button, box1, box2, separator, a_label, quitbox : PGtkWidget;
   which						   : Integer;

begin
   { Our init, don't forget this! }
   gtk_init(@argc, @argv);

   if argc <> 2 then
   begin
      writeln('usage: packbox num, where num is 1, 2, or 3');
      { This just does cleanup in GTK and exits with an exit status of 1. }
      gtk_exit(1);  //!!! exit
   end;

   which := StrToInt(argv[1]);

   { Create our window. }
   window := gtk_window_new(GTK_WINDOW_TOPLEVEL);

   { You should always remember to connect the "delete-event" signal
     to the main window.  This is very important for proper intuitive
     behaviour. }
   g_signal_connect(window, 'delete-event',
                    G_CALLBACK(@delete_event), nil);
   gtk_container_set_border_width(GTK_CONTAINER(window),10);

   { We create a vertical box (vbox) to pack the horizontal boxes into.
     This allows us to stack the horizontal boxes filled with buttons
     one on top of the other in this vbox. }
   box1 := gtk_vbox_new(false, 0);

   { Which example to show. These correspond to the pictures above. }
   case which of
     1 : begin
            { Create a new label. }
            a_label := gtk_label_new('gtk_hbox_new (FALSE,0);');
            { Align the label to the left side. We'll discuss this function
              and others in the section on Widget Attributes.}
            gtk_misc_set_alignment(GTK_MISC(a_label), 0, 0);

            { Pack the label into the vertical box (vbox box1). Remember that
              widgets added to a vbox will be packed one on top of the other
              in order. }
            gtk_box_pack_start(GTK_BOX(box1), a_label, false, false, 0);

            { Show the label.}
            gtk_widget_show(a_label);

            { Call our make box function: homogeneous := false, spacing = 0,
              expand = false, fill := false, padding := 0 }
            box2 := make_box(false, 0, false, false, 0);
            gtk_box_pack_start(GTK_BOX(box1), box2, false, false, 0);
            gtk_widget_show(box2);

            { Call our make box function: homogeneous = false, spacing = 0,
              expand = true, fill = false, padding = 0 }
  	    box2 := make_box (false, 0, true, false, 0);
	    gtk_box_pack_start(GTK_BOX(box1), box2, false, false, 0);
	    gtk_widget_show(box2);

            { Args are: homogeneous, spacing, expand, fill, padding}
            box2 := make_box (false, 0, true, true, 0);
            gtk_box_pack_start(GTK_BOX(box1), box2, false, false, 0);
            gtk_widget_show(box2);

            { Creates a separator, we'll learn more about these later,
              but they are quite simple. }
            separator := gtk_hseparator_new();

            { Pack the separator into the vbox. Remember each of these
              widgets is being packed into a vbox, so they'll be stacked
              vertically. }
            gtk_box_pack_start(GTK_BOX(box1), separator, false, true, 5);
            gtk_widget_show(separator);

            { Create another new label, and show it. }
            a_label := gtk_label_new('gtk_hbox_new (TRUE, 0);');
            gtk_misc_set_alignment(GTK_MISC(a_label), 0, 0);
            gtk_box_pack_start(GTK_BOX(box1), a_label, false, false, 0);
            gtk_widget_show(a_label);

            { Args are: homogeneous, spacing, expand, fill, padding }
            box2 := make_box(true, 0, true, false, 0);
            gtk_box_pack_start(GTK_BOX(box1), box2, false, false, 0);
            gtk_widget_show(box2);

            { Args are: homogeneous, spacing, expand, fill, padding }
            box2 := make_box(true, 0, true, true, 0);
            gtk_box_pack_start(GTK_BOX(box1), box2, false, false, 0);
            gtk_widget_show(box2);

            { Another new separator. }
            separator := gtk_hseparator_new();
            { The last 3 arguments to gtk_box_pack_start are:
             expand, fill, padding. }
            gtk_box_pack_start(GTK_BOX(box1), separator, false, true, 5);
            gtk_widget_show(separator);
         end;

     2 : begin
            { Create a new label, remember box1 is a vbox as created
              near the beginning of main() }
            a_label := gtk_label_new('gtk_hbox_new (false, 10);');
            gtk_misc_set_alignment(GTK_MISC(a_label), 0, 0);
            gtk_box_pack_start(GTK_BOX(box1), a_label, false, false, 0);
            gtk_widget_show(a_label);

            { Args are: homogeneous, spacing, expand, fill, padding }
            box2 := make_box(false, 10, true, false, 0);
            gtk_box_pack_start(GTK_BOX(box1), box2, false, false, 0);
            gtk_widget_show(box2);

            { Args are: homogeneous, spacing, expand, fill, padding }
            box2 := make_box(false, 10, true, true, 0);
            gtk_box_pack_start(GTK_BOX(box1), box2, false, false, 0);
            gtk_widget_show(box2);

            separator := gtk_hseparator_new();
            { The last 3 arguments to gtk_box_pack_start are:
              expand, fill, padding. }
            gtk_box_pack_start(GTK_BOX(box1), separator, false, true, 5);
            gtk_widget_show(separator);

            a_label := gtk_label_new('gtk_hbox_new (false, 0);');
            gtk_misc_set_alignment(GTK_MISC(a_label), 0, 0);
            gtk_box_pack_start(GTK_BOX(box1), a_label, false, false, 0);
            gtk_widget_show(a_label);

            { Args are: homogeneous, spacing, expand, fill, padding }
            box2 := make_box(false, 0, true, false, 10);
            gtk_box_pack_start(GTK_BOX(box1), box2, false, false, 0);
            gtk_widget_show(box2);

            { Args are: homogeneous, spacing, expand, fill, padding }
            box2 := make_box(false, 0, true, true, 10);
            gtk_box_pack_start(GTK_BOX(box1), box2, false, false, 0);
            gtk_widget_show(box2);

            separator := gtk_hseparator_new();
            { The last 3 arguments to gtk_box_pack_start are: expand, fill,
              padding. }
            gtk_box_pack_start(GTK_BOX(box1), separator, false, true, 5);
            gtk_widget_show(separator);
         end;

     3 : begin
            { This demonstrates the ability to use gtk_box_pack_end() to
              right justify widgets. First, we create a new box as before. }
            box2 := make_box(false, 0, false, false, 0);

            { Create the label that will be put at the end. }
            a_label := gtk_label_new('end');
            { Pack it using gtk_box_pack_end(), so it is put on the right
              side of the hbox created in the make_box() call. }
            gtk_box_pack_end(GTK_BOX(box2), a_label, false, false, 0);
            { Show the label. }
            gtk_widget_show(a_label);

            { Pack box2 into box1 (the vbox remember ? :) }
            gtk_box_pack_start(GTK_BOX(box1), box2, false, false, 0);
            gtk_widget_show(box2);

            { A separator for the bottom. }
            separator := gtk_hseparator_new();
            { This explicitly sets the separator to 400 pixels wide by 5 pixels
              high. This is so the hbox we created will also be 400 pixels wide,
              and the "end" label will be separated from the other labels in the
              hbox. Otherwise, all the widgets in the hbox would be packed as
              close together as possible. }
            gtk_widget_set_size_request(separator, 400, 5);
            { Pack the separator into the vbox (box1) created near the start
              of main() }
            gtk_box_pack_start(GTK_BOX(box1), separator, false, true, 5);
            gtk_widget_show(separator);
         end;
   end;

   {Create another new hbox... remember we can use as many as we need!}
   quitbox := gtk_hbox_new(false, 0);

   { Our quit button }
   button := gtk_button_new_with_label('Quit');

   { Setup the signal to terminate the program when the button is clicked }
   g_signal_connect_swapped(button, 'clicked',
			    G_CALLBACK(@gtk_main_quit), window);

   { Pack the button into the quitbox.
     The last 3 arguments to gtk_box_pack_start are:
     expand, fill, padding. }
   gtk_box_pack_start(GTK_BOX(quitbox), button, true, false, 0);
   { Pack the quitbox into the vbox (box1) }
   gtk_box_pack_start(GTK_BOX(box1), quitbox, false, false, 0);

   { Pack the vbox (box1) which now contains all our widgets,
     into the main window }
   gtk_container_add(GTK_CONTAINER(window), box1);

   { And now show everything. }
   gtk_widget_show(button);
   gtk_widget_show(quitbox);

   gtk_widget_show(box1);
   { Showing the window last so everything pops up at once. }
   gtk_widget_show(window);

   { And, of course, our main function. }
   gtk_main();
end.
Let's take a look at another way of packing - Tables. These can be extremely useful in certain situations.
Using tables, we create a grid that we can place widgets in. The widgets may take up as many spaces as we specify.
The first thing to look at, of course, is
the gtk_table_new() function:
function gtk_table_new (rows : guint;
                        columns : guint;
                        homogenous : gboolean) : PGtkWidget;
The first argument is the number of rows to make in the table, while the second, obviously, is the number of columns.
The homogeneous argument has to do with how the table's boxes are sized.
If homogeneous is true, the table boxes
are resized to the size of the largest widget in the table.
If homogeneous is false, the size of
a table boxes is dictated by the tallest widget in its same row,
and the widest widget in its column.
The rows and columns are laid out from 0 to n, where n was the number
specified in the call to gtk_table_new().
So, if you specify rows = 2 and columns = 2, the layout would look
something like this:
 0          1          2
0+----------+----------+
 |          |          |
1+----------+----------+
 |          |          |
2+----------+----------+
Note that the coordinate system starts in the upper left hand corner. To place a widget into a box, use the following function:
procedure gtk_table_attach (table : PGtkTable;
                            child : PGtkWidget;
                            left_attach : guint;
                            right_attach : guint;
                            top_attach : guint;
                            bottom_attach : guint;
                            x_options : GtkAttachOptions;  {or gint}
                            y_options : GtkAttachOptions;  {or gint}
                            x_padding : guint;
                            y_padding : guint);
The first argument (table) is the table you've created and the second (child) the widget you wish to place in the table.
The left and right attach arguments specify where to place the widget, and how many boxes to use. If you want a button in the lower right table entry of our 2x2 table, and want it to fill that entry only, left_attach would be = 1, right_attach = 2, top_attach = 1, bottom_attach = 2.
Now, if you wanted a widget to take up the whole top row of our 2x2 table, you'd use left_attach = 0, right_attach = 2, top_attach = 0, bottom_attach = 1.
The x_options and y_options are used to specify packing options
and may be OR'ed together to allow multiple
options. These options are:
GTK_FILL
If the table box is larger than the widget, and GTK_FILL is specified, the widget will expand to use all the room available.
GTK_SHRINK
If the table widget was allocated less space then was requested (usually by the user resizing the window), then the widgets would normally just be pushed off the bottom of the window and disappear. If GTK_SHRINK is specified, the widgets will shrink with the table.
GTK_EXPAND
This will cause the table to expand to use up any remaining space in the window.
Padding is just like in boxes, creating a clear area around the widget specified in pixels.
gtk_table_attach() has a lot
of options. So, there's a shortcut:
procedure gtk_table_attach_defaults (table : PGtkTable;
                                     widget : PGtkWidget;
                                     left_attach : guint;
                                     right_attach : guint;
                                     top_attach : guint;
                                     bottom_attach : guint);
The X and Y options default to GTK_FILL | GTK_EXPAND, and X and Y padding are set to 0. The rest of the arguments are identical to the previous function.
We also have gtk_table_set_row_spacing() and
gtk_table_set_col_spacing(). These places
spacing between the rows at the specified row or column.
procedure gtk_table_set_row_spacing (table : PGtkTable;
                                     row : guint;
                                     spacing : guint);
and
procedure gtk_table_set_col_spacing (table : PGtkTable;
                                     column : guint;
                                     spacing : guint);
Note that for columns, the space goes to the right of the column, and for rows, the space goes below the row.
You can also set a consistent spacing of all rows and/or columns with:
procedure gtk_table_set_row_spacings (table : PGtkTable;
                                      spacing : guint);
and
procedure gtk_table_set_col_spacings (table : PGtkTable;
                                      spacing : guint);
Note that with these calls, the last row and last column do not get any spacing.
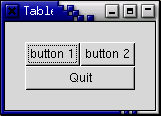
Here we make a window with three buttons in a 2x2 table. The first two buttons will be placed in the upper row. A third, quit button, is placed in the lower row, spanning both columns. Which means it should look something like this:
Here's the source code:
program TableExample;

uses gtk2, gdk2, glib2;

{ Our callback.
  The data passed to this function is printed to stdout}

procedure callback (Widget : PGtkWidget; Data : gpointer); cdecl;
begin
   writeln('Hello again, ', PChar(Data), ' was pressed');
end;

{This callback quits the program}

function delete_event (widget : PGtkWidget; event : PGdkEvent;
                       data : gpointer) : boolean; cdecl;
begin
   gtk_main_quit();
   delete_event := false;
end;

var
   window, button, table : PGtkWidget;

begin
   gtk_init(@argc, @argv);

   { Create a new window }
   window := gtk_window_new(GTK_WINDOW_TOPLEVEL);

   { Set the window title }
   gtk_window_set_title(GTK_WINDOW(window), 'Table');

   { Set a handler for delete_event that immediately exits GTK. }
   g_signal_connect(window, 'delete-event',
                    G_CALLBACK(@delete_event), nil);

   { Sets the border width of the window. }
   gtk_container_set_border_width(GTK_CONTAINER(window), 20);

   { Create a 2x2 table }
   table := gtk_table_new(2, 2, true);

   { Put the table in the main window }
   gtk_container_add(GTK_CONTAINER(window), table);

   { Create first button }
   button := gtk_button_new_with_label('button 1');

   { When the button is clicked, we call the "callback" function
     with a pointer to 'button 1' as its argument}
   g_signal_connect(button, 'clicked',
                    G_CALLBACK(@callback), pchar('button 1'));

   { Insert button 1 into the upper left quadrant of the table }
   gtk_table_attach_defaults(GTK_TABLE(table), button, 0, 1, 0, 1);

   gtk_widget_show(button);

   { Create second button }
   button := gtk_button_new_with_label('button 2');

   { When the button is clicked, we call the "callback" function
     with a pointer to 'button 2' as its argument }
   g_signal_connect(button, 'clicked',
                    G_CALLBACK(@callback), pchar('button 2'));
   { Insert button 2 into the upper right quadrant of the table }
   gtk_table_attach_defaults(GTK_TABLE(table), button, 1, 2, 0, 1);

   gtk_widget_show(button);

   { Create "Quit" button }
   button := gtk_button_new_with_label('Quit');

   { When the button is clicked, we call the "delete_event" function
     and the program exits}
   g_signal_connect(button, 'clicked',
                    G_CALLBACK(@delete_event), NIL);

   { Insert the quit button into the both lower quadrants of the table }
   gtk_table_attach_defaults(GTK_TABLE(table), button, 0, 2, 1, 2);

   gtk_widget_show(button);

   gtk_widget_show(table);
   gtk_widget_show(window);

   gtk_main();
end.