This chapter shows you how to add new classes of object to your Smalltalk image and how to program their behaviour by adding methods to them. As you do this you will be extending the capabilities of the basic system. For this reason, you should now be saving your image on a regular basis (to avoid losing these changes) and especially when exiting the Dolphin environment.
This is what "programming" is in Smalltalk; producing a new image with the appropriate classes and behaviour to do what you want. A Smalltalk "program" is an image embued with an interacting network of objects. It's a bit like your waking day; when you get out of bed in the morning there is no need to start from scratch again. Instead you are able to pick up exactly where you left off the previous day, with all the objects in your life ready to go. This is what happens when you start a Smalltalk image; everything is there just as it was when you last shut the image down.
Tip: if you are from a more "traditional" programming background you may be confused by this at first and wonder where a Smalltalk program starts. There is no main entry point. When your program loads, the image will already contain the initial set of objects ready to go.
This chapter teaches you how to "program" in Smalltalk.
In this chapter we will build an implementation of a simple animal guessing game. The game will ask you to think of an animal and it will then try to guess what it is by asking a series of questions. If it turns out that it does not know the animal you are thinking of then the program will ask you to tell it what it was so it can learn this new animal for future games.
I originally saw this game written a long time ago in a compendium of BASIC programs (written when BASIC was far from "Visual"). It was the first learning program that I'd seen and I was amazed that something so simple could appear to be "intelligent". I thought it would be interesting to see what it looked like in Smalltalk, so here it is.
The full game has been provided in a package called Animals. At this stage, you might like to load this into your image using the Package Browser just so you can see what it is intended to do. You should find the package in the Samples/Animal Game directory beneath the location where Dolphin is installed. Double-click over Animals.pac to install it into your image.
Tip: If you can't locate the package on your local computer then you can download it from the web. Please make sure you save this file in a Samples/Animals Game subdirectory beneath your Dolphin installation.
Once the package is in your image, then go to a workspace and evaluate:
Animal playGame.
You will be asked to think of an animal and then to respond to questions about it. Initially, the game only knows one animal (a dog) so the first round will be pretty boring. If the game does not know the animal you are thinking of then it will ask you to enter its name so it can learn it for next time. You will also be asked to think of a question that distinguishes the new animal from one that is already in the database. Make sure you follow the instructions here and enter a question that fits the format requested.
When you get tired of expanding the Animal game's knowledge base then be sure to uninstall the package from your image so that you can follow the tutorial in this chapter. You can do this using the Package Browser's, Package/Uninstall menu command.
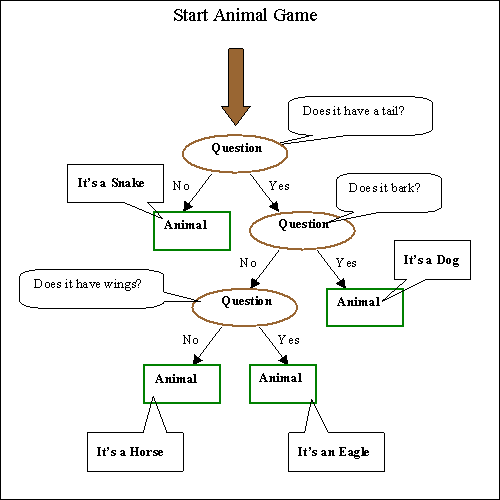
Before we use the Dolphin development system to design and build this game it might be useful to look at how it works. Let us consider exactly what this game does. It builds up a knowledge base of the animals that it knows about and, in order for it to be able to guess sensibly, this must also contain questions that enable it to distinguish between one animal and another. In this version of the game each question has a yes or a no answer. This might lead us to think that a "tree" of objects something like the following can represent the knowledge base:
This is an inverted tree with its root(s) at the top of the diagram. The brown Question nodes represent the branches and the leaves are at the Animal nodes in green. Pick one of the animals in the diagram (Dog, Snake, Eagle or Horse) as your guess and follow the decision tree through from the root of the tree starting at the brown arrow.
So it seems that we can build our animal knowledge base from two classes of object; Animals and Questions. We will also have to hold the tree's root object (always a Question) somewhere so we can get access to it in order to start the game. You'll see how to do this later.
Right, let us now try to add the Animal class to our image. Before we do this, we need to know a little bit about class inheritance. Open a Class Hierarchy Browser and select Object in the class hierarchy pane at the top left. If Object is the only class that is visible in this pane then double-click it to expand the display until it appears as below.
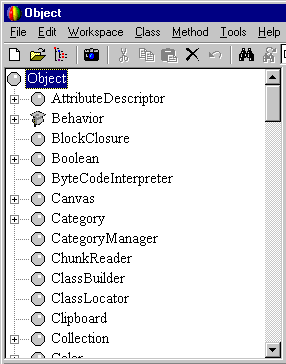
As you can see, the browser is displaying some of the many classes that already exist in the image. These classes exist in a hierarchy where each class (apart from Object) is a child of some parent. This hierarchy is important since it governs how any particular class can "inherit" some of its parent's functionality. For example, with Object selected, the browser will be displaying all of the methods defined for this class in the method pane at top right. Now click on Boolean and you'll see a list of its methods instead. As you can see, the number of methods that appear to be available for Boolean is much smaller than for Object. However, this is not the definitive list. Since Boolean is a "subclass" of Object it inherits all of the latter's methods, which means that Boolean instances can respond to all of these messages too.
Tip: Actually, this is rather a false example since instances of Boolean can never exist. It is what is called an abstract class. If you double-click on Boolean to expand it and display its subclasses you'll see that it has two; True and False. Instances of these classes do exist and they can respond to any of the messages defined for Object and Boolean as well as those defined for themselves.
As you can no doubt see, this inheritance of behaviour can be a great time saver. By choosing an appropriate place in the hierarchy to define a new class you can save yourself having to rewrite, and duplicate, code which has already been written and tested previously.
Okay, now for a couple of definitions. We have seen that a class can have a number of child classes beneath it. These are known as its subclasses. It therefore follows that the parent of a particular class should equally be known as its superclass. Every class apart from Object will have one, and only one, superclass but may have many subclasses. Object is unique in not having a superclass because it is the root of the hierarchy.
Tip: Once again I've introduced a slight simplification here. There actually can be other classes like Object which exist at the root of the hierarchy and therefore have no superclasses. This is quite an advanced topic so we shall not dwell on it here.
So, back to Animal. Where in the class hierarchy should we choose to create this class? The first thing to consider is what sort of information will each instance of Animal hold. Looking at the knowledge base diagram above we can see that each animal must at least know its name; i.e. what sort of animal it is. This will be in the form of a Smalltalk text String such as: 'Dog', 'Cat', 'Horse' etc. So, a possible location in the class hierarchy that we might consider would be to make Animal a subclass of String. To look at this decision in more detail, find the String class in the Class Hierarchy Browser (remember you can do this using the Class/Find menu command) and take a look at the methods that are defined for all Strings.
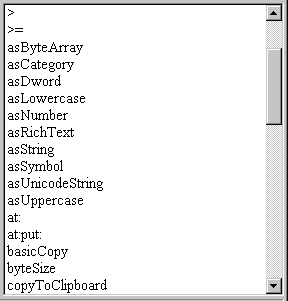
If we make our Animal class a subclass of String then we will inherit all of these methods. This may, or may not, be what we want. Think about it; does it make sense for an Animal to understand messages such as #>= and #asNumber etc? No, not really!
What we should actually be asking is whether an Animal "is a String" or whether it, in fact, should "contain a" String. This is one of the fundamental decisions that software designers make when they are performing an "object oriented analysis" on a design problem. Often a problem is complex enough that it is worth drawing a diagram of the object model and this will illustrate the relationships between the various objects in the system. The relationships are often described as Is-a and Contains-a relationships.
It is my suggestion, therefore, that an Animal should contain a String and not be a subclass of one. So, we still haven't yet decided exactly where Animal should be subclassed in the overall hierarchy. In these situations it is best just to start off with your class being a direct subclass of Object (it is to represent an object after all). This is a very good default starting point. The great thing about Smalltalk is that, if you should later discover that there is a more suitable superclass somewhere in the image, then it is really easy to refactor and move your class to this new location in the hierarchy.
Let's now create the Animal class as a subclass of Object. To do this, select the superclass Object in the Class Hierarchy Browser and choose Class/New. You will be prompted to enter a name for the class you want to create; in this case Animal.
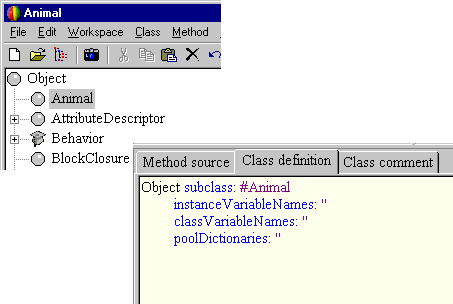
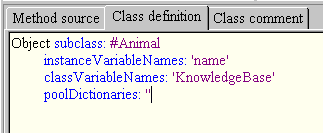
You'll then see that the browser has created your class and will also display a Smalltalk definition of it in the Class definition pane at the bottom.
Tip: The area at the bottom of the Class Hierarchy Browser can display of one of three panes depending on which tab is selected. You can choose from Method source, Class definition and Class comment.
At present the Class definition pane will have
been selected automatically to show you the definition of the
class that has just been created. We hinted in the previous
chapter that the contents of this pane contains a Smalltalk
expression that could be evaluated in any workspace to create the
class. Look closely and you'll see that the message #subclass:instanceVariableNames:classVariableNames:poolDictionaries:
is being sent to Object in order to do this. It's
convenient that the browser saves us the typing and composes and
evaluates this expression for us.
Now let's go back to consider the data that each instance of our Animal class must hold. We mentioned before that we need to be able to hold the name of the animal as a String and we will therefore need an instance variable to do this. So, let's add an instance variable called name. Using the mouse, place the text insertion cursor in the text string that immediately follows instanceVariableNames: and type the variable name.
Object subclass: #Animal
	instanceVariableNames: 'name'
	classVariableNames: ''
	poolDictionaries: ''
In order to commit this change into the image simply type Ctrl+S or choose Accept from the Workspace menu.
Congratulations, you have just added your first class to your Dolphin image. You can change the class definition at any time simply by modifying it in the Class definition pane and accepting the change. Now might be a suitable time to save your image.
Our next task will be to use the Class Hierarchy Browser to add some method definitions to the Animal class.
One of the things about object-oriented programming in general, and Smalltalk in particular, is that it is not possible to gain access to the data stored in an object except by means of methods written in the class. For example, we will want to be able to set and retrieve the value in the name instance variable slot of an Animal and, to do this, we will need to write a couple of methods. These are known as accessor methods. We will want to add methods for #name and #name:.
Select the Animal class in the Class Hierarchy Browser and choose the Method/New command. This sets up the browser ready to receive a new method definition in the Method source pane. Enter the following method:
name "Answer the name of the receiver" ^name |
Choose Workspace/Accept or type Ctrl+S to accept this new method definition into the image. You'll see that, after the browser compiles the method, it is then redisplayed in the source pane in coloured text. The different colours identify different parts of the language and quite soon you'll find this makes the methods easier to read.
The method that we have just added included the ^ symbol to indicate that a value should be returned from the method. The intention of this particular accessor method is just to return the value held in the name instance variable. Now let us add another method to set the value of this instance variable. Once again choose Method/New and enter and accept the following code:
name: aStringName "Private - Initialize the name of the receiver to aStringName" name := aStringName |
This method receives one parameter that I've given a name of aStringName to identify it. Notice how the name chosen for this parameter can indicate to the reader of the code what type of object is acceptable here, e.g. a String. This is purely done for readability, so at no time will the system insist that actually only a String is allowable. It can be a useful practice to get into the habit of naming parameters in this way so that someone browsing through the methods of your program in future will have a better idea how to use them.
The sole purpose of this method is to assign the contents of the passed parameter to the name instance variable. Notice that I have chosen to label the method as Private within the method comment. It was discussed in the previous chapter that Smalltalk does not enforce such method privacy but, once again, this is useful documentation for any programmer intending to make use of our Animal class. What it indicates is that, under normal circumstances, one would not expect to call this method directly.
Tip: You may be wondering what this method is for if it is not intended to be directly called. We'll see the reasoning for this later.
We mentioned before that it is useful to place methods in categories to help identify them, and it is best to do this as you enter each method. There are several ways in which the Class Hierarchy Browser can help you categorise methods but the simplest is probably to ask it to suggest a category for you. Select the method in question, say #name, and choose Method/Suggest category. You will be prompted with a dialog of category suggestions that the browser thinks are suitable for this particular method.
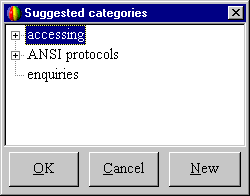
Those categories listed with a + symbol adjacent to them can be expanded. Yes, that's right, categories can exist in a hierarchy too. All you need to do is to double click the category that you think is most appropriate for your method and it will automatically be added into it. In this case, since we are dealing with an accessor method it would seem appropriate to enter it into the accessing category.
Tip: You can also bring up the category suggestion dialog by clicking over the method in question with the right mouse button. This will pop-up a context menu for the method and you can choose Suggest category from within this.
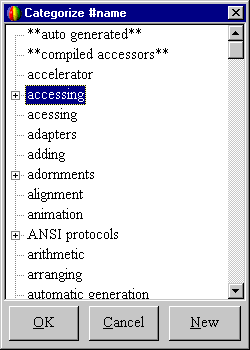
It is always possible, and indeed quite likely, that the category suggestion box may not contain a category that you consider to be suitable for your method. If this happens, then click Cancel to dismiss the box and use the Method/Category command to bring up the following alternative dialog that displays a list of all the categories currently in the image.
Tip: Once again this dialog can also be brought up from the context menu for the method. Simply right-click over the method and choose the Category command.
From this dialog you can assign your method to any one of the existing categories in the system and, if you still don't think any of these are appropriate, you can create a new category by clicking the New button.
The good thing about Smalltalk is that it's really easy to test things quickly. Why don't we create an instance of Animal and see what we can do with it so far. In a workspace evaluate:
myAnimal := Animal new.

"Display the following"
myAnimal name.

"Now give it a name"
myAnimal name: 'Dog'.

"And display the name again"
myAnimal name.
These simple tests show how we can create a new instance of an Animal, assign a name to it and then query the name again.
Okay, look back to that test that we just did. Immediately after we had created the fresh instance we queried its name and got back a (perhaps) surprising result; nil. This is a special value that Smalltalk uses to indicate that a variable slot has not yet been initialized. Nil is actually an object in its own right (if you ask it its class it will answer that it is an instance of UndefinedObject). In Smalltalk everything is an object - right down to the concept of nothingness!
Nil can be used for more than just testing whether something is uninitialized. You'll also find it useful in your own programs when you want to represent the concept of something being in an undefined state.
By default, all classes respond to a #new message and answer an instance of the class. We used this fact in our previous test. We didn't have to write the #new method ourselves since all classes inherit this via their superclass chain.
Tip: You might expect to find this method in the Object class. However, it isn't there, but rather it's in class Class. Why not use the browser to take a look?
However, using #new to create an instance of Animal isn't really ideal since, as we've seen, we end up with an animal that has a nil name. It would be much better if we could ensure that as each instance is created it is properly initialized with a valid String name. We can do this by adding an instance creation method that takes as its parameter the name of the animal to be created. Such a method is not applicable to an instance of Animal but rather to the class itself. For this reason it is called a class method (as opposed to the instance methods we have created so far).
To create a class method you must first select the Class tab in the class hierarchy browser.
![]()
The browser will then switch to displaying the class methods of the current class rather than its instance methods. Now add the following method to the class side:
name: aStringName "Answer an instance of the receiver with aStringName" ^self new name: aStringName |
As you can see, this creates a new instance of Animal and then sends it a #name: message to initialize its name. To indicate that this is indeed an instance creation method, you should add it to the instance creation category. This time try right-clicking over the method and choosing Category from the pop-up context menu that appears.
Tip: Now it might become apparent why we marked the #name: method on the instance side of Animal as being private. The intention is that this method will only be called from the class method of the same name. We don't expect that an Animal instance, once it has been created, will ever have its name changed so we indicate this by suggesting the method is private and therefore it should not be called explicitly.
There are many situations where we might want to display one of our objects as a text string. By convention, Smalltalk provides a number of methods defined in Object for this purpose.
It is generally assumed that these messages can be used to display any object as an end-user would expect to see them. The first, #displayString, will answer a String representation of the object. The second takes a Stream as its only parameter and outputs the textual representation of the object to this stream. Streams are the subject of a later chapter so we won't go into too much detail about them here. The thing to note, however, is that #displayString is usually implemented in terms of #displayOn:. This means that if we need to change the way an object is represented as end-user text we normally only need to implement a #displayOn: method. First of all, let us see how an Animal responds to #displayString by default. Try executing the following example in a workspace.
tiger := Animal name: 'Tiger'.

"Display this"
tiger displayString.
Now, displaying this just as a "an Animal" is surely a little lacklustre. Let's override the default implementation of #displayOn: (found in Object and which provides the grunt work for #displayString) to at least report the name of the animal involved. Add the following method to Animal.
IMPORTANT: Since this is to be an instance side method, make sure you click the Instance tab in the browser first.
displayOn: aStream "Answer the name of the receiver prepended by 'a' or 'an' as appropriate" | aOrAn | aOrAn := name first isVowel ifTrue: ['an '] ifFalse: ['a ']. aStream nextPutAll: aOrAn; nextPutAll: self name. |
Use the Suggest category facility to add this method to the displaying category.
Now try testing #displayString again and you should see a more user-friendly representation of the tiger:
"Display this"
tiger displayString.
Writing a method like this in a derived class, which has the same name as a method in a superclass, is known as overriding the original method. This is another important aspect that forms part of object-oriented programming.
These messages are used in a similar way to the #displayString and #displayOn: methods except that they are intended to create a textual representation of an object as a developer (a rather than an end-user) would wish to see it. The default implementation of these methods in Object will merely tell the developer what the class of the object is (e.g. an Animal). Now let us override #printOn: to also display the animal's name along with its class.
printOn: aStream "Answer the name of the receiver as a developer would wish to see it." super printOn: aStream. aStream nextPut: $(. self displayOn: aStream. aStream nextPut: $). |
Again use Suggest category to categorise the method, this time adding it to the printing category.
To test this in the workspace, display the result of evaluating the following.
"Print this"
tiger printString.
If everything has gone according to plan this should print as "an Animal(a Tiger)". Whenever you add a new class to your image you should probably consider overriding one or more of the #displayOn: and #printOn: methods. You might want to do this even if you don't need to represent your object as text in your initial design; it's very likely that this could become a requirement at sometime in the future.
In the last method we added we managed to slip in a couple of new and very important concepts; of those of self and super.
If, in a method, we want to send another message to the receiving object then we use the special word self to represent the object. Take a look at the #printOn: method again to see how this works. We want to use the ability of #displayOn: to print-out the animal's name as a part of the overall representation. We do this by sending the #displayOn: message to self.
Perhaps a more difficult concept to explain is that of super. We use this when we want to send a message to the receiver but we don't want any local declaration (in the receiver's class) of the corresponding method to be executed. Therefore, when you send a message to super, the system will begin its search for the method to execute, not in the class of the receiver, but in its superclass. This is very commonly used when overriding a method. Often you will want to inherit the existing functionality from the overridden method and yet augment it with additional code of your own. This is exactly what is happening in the #printOn: method we have just written.
Question: What would have happened in this method if we had inadvertently sent #printOn: to self rather than super?
It's a sure bet that you'll find self and super cropping up extensively in the code that you write from now on.
We mentioned earlier that the Animal game would probably require two classes. So far we have added a class called Animal and we have put in place the basic functionality for this. Now let us create the second of the two classes; Question.
So what do we know about how a Question object should behave? Well, look back to the diagram at the beginning of this chapter illustrating the data structure for a typical Animal game. In the same way that each Animal object has a name we will require that each Question will also need to hold onto a text string which is the question to be asked. In addition to this, each Question object must also be able to indicate which branch of the tree to follow given a yes or no response to the question. So it seems sensible to assume that we might need three instance variables, text, yes and no. Thinking about it, we might also decide that the most sensible superclass for Question is again to be Object. Bearing all this in mind you should follow the following steps to add this new class to your image.
Select Object in the Class Hierarchy Browser. Now use the Class/New menu command to create the Question subclass of Object. Add the new instance variables and re-compile the definition as indicated below.
Object subclass: #Question
	instanceVariableNames: 'text yes no'
	classVariableNames: ''
	poolDictionaries: ''
First of all add the following methods to be able to get the values of the three instance variables.
yes "Answer the branch in the knowledge tree to take as the result of a 'yes' answer to the receiver's question." ^yes |
no "Answer the branch in the knowledge tree to take as the result of a 'no' answer to the receiver's question." ^no |
text "Answer the receiver's question as a text String" ^text |
It will certainly be useful to be able to access the values of these variables separately. However, once an instance of Question has been created we should never need to set the values of these variables again. Therefore, it makes sense that we should be able to use a private method to set all of these variables at once during instance creation. We'll use the following method to do this:
text: aString yes: yesPath no: noPath "Private - Set the text of the receiver to aString and the yes and no branches to yesPath and noPath respectively. This is a bit tricky. At the end of this operation we want the receiver to have completely swapped its identity with the original noPath. This is a bit of a kludge (since there are better ways to insert the receiver in the knowledge tree at the right point) but it is the simplest solution for this example program." text := aString. yes := yesPath. no := self. self become: noPath |
Okay, so you've spotted the final line and want to know what that is all about. Well, to be honest, the use of the #become: message is beyond the real scope of this chapter and its use in this example program is only due to the fact that I wanted to shorten the program to make it easier to understand. However, for those who are interested, the tip below explains why it is here.
Tip: Imagine an existing knowledge tree for the game (I suggest you refer back to the original diagram) and we have got to the situation where the computer does not know the animal in question. Let us assume for the sake of this description that the computer believes you are probably thinking about an "eagle" but, in fact, you are thinking about a "sparrow". What we need to do is to create a new Animal object representing the "sparrow" and also to create a new Question that is capable of distinguishing the two animals. When we have completed linking these two new objects into our knowledge base the original Question that led to the "eagle" node will now have to point to the new distinguishing Question node. The easiest way to do this is to ask the two objects (the "eagle" and the new question) to swap identities. This is what #become: does.
Make sure you add these methods to the accessing category.
Now we need a class method to use when creating a Question instance.
IMPORTANT: Make sure you set the Class Hierarchy Browser into Class mode before adding this method otherwise it will override the one you have just created on the instance side.
text: aString yes: yesPath no: noPath "Answer an instance of the receiver (a Question) having aString as it's text and leading to the nodes at yesPath and noPath as the result of those answers to its question." ^self new text: aString yes: yesPath no: noPath |
This method must go into the instance creation category.
The following methods allow for a Question to be represented as text from the point of view of an end-user and developer respectively. You can use the category suggestion feature of the browser to place these methods into their correct categories.
IMPORTANT: Place the browser back into Instance mode before adding these methods.
displayOn: aStream "Answer the name of the receiver as a user should see it. For this we append a question mark." aStream nextPutAll: self text; nextPutAll: ' ?'. |
printOn: aStream "Answer the name of the receiver as a developer would wish to see it." super printOn: aStream. aStream nextPut: $(. self displayOn: aStream. aStream nextPut: $). |
Sometime ago we mentioned that we would need to hold the root of the knowledge base in a variable, if only so the game will know where to get hold of it when it starts. Now is the time to create and initialize this variable. We could, of course, choose to use a global variable for this purpose. However, it is usual to frown upon global variables since they may clash with similarly named variables in another application. Fortunately there is an excellent alternative; to use a class variable.
We have seen how instance variables can be used to hold data that is associated with a particular instance. Well it is also possible to create another type of variable that is associated with a particular class object. It's very easy to add class variable slots to your class by using the Class Hierarchy Browser. Let us choose to add a class variable called KnowledgeBase to the Animal class. First of all select Animal in the browser and then choose the Class definition tab to display the existing definition. Modify this as shown below and accept the change using Ctrl+S.
Tip: It is conventional for the names of class variables to begin with an uppercase letter.
This new variable can be used like any other but only within the scope of the Animal class. This means that you can use it in any methods (either instance or class) that are defined for Animal or its subclasses. You will not, however, be able to successfully reference the KnowledgeBase variable from any other class or workspace. This means that you would not be able to reference it from within the Question class, for example. The good thing about this additional level of privacy compared with true globals means that no other class or program can modify this variable inadvertently.
Tip: Sometimes you might want to allow methods outside the normal scope to be able to access a class variable. This is quite possible, and is simply a matter of defining some accessor methods in much the same way as you would for instance variables. The only difference, of course, is that the accessor methods you define for a class variable must be defined as class methods rather than instance ones. Anyway, in our Animal game will only need to reference the KnowledgeBase from within the Animal class so we'll have no need for any accessor methods.
The next job is to initialize the KnowledgeBase so that it has a suitable root object for the game to start with. If we add this initialization as part of a class method then we can re-use it when we want to clear down the game and start afresh (i.e. forget all the game has learnt). So, add the following class method to Animal and place it in the initializing category.
initialize "Initialize the Animal game knowledge base. To start with we only know about Dogs" KnowledgeBase := self name: 'Dog' |
As the method suggests, we'll start off with the game only knowing about dogs.
Now, in a workspace, evaluate the following to actually perform the initialization.
Animal initialize.
Tip: The inclusion of an #initialize class method has a special additional significance for when you choose to save out your work so it can be imported into someone else's Dolphin image. As a class is loaded into a new image the system checks to see if an #initialize class method exists and, if it does, this is executed automatically. Consequently, this is a great way to ensure that class variables (and suchlike) are properly set up.
So now we have most of the elements in place for our Animal game and it just remains to add a few methods that wire all the pieces together. First of all, since we are going to be adding methods to both the Question and Animal classes, I'd like to introduce a bit of nomenclature that will help avoid any confusion as to exactly where the methods belong. Take a look at the following:
Animal>>thisMethod Indicates that thisMethod belongs on the instance side of the Animal class |
Animal class>>thisMethod Indicates that thisMethod belongs on the class side of the Animal class |
Question>>thisMethod Indicates that thisMethod belongs on the instance side of the Question class |
Question>>thisMethod Indicates that thisMethod belongs on the instance side of the Question class |
This >> symbol is commonly used as a means of documenting that a method belongs to a particular class you'll find that we use it quite often from now on in this guide.
When a game is in progress much of the action will be to do with the computer asking you questions. As the game traces through the knowledge tree, at any particular time it will be looking at either a Question node or, if it thinks it knows what the animal is, an Animal node. Do you remember how you traced through a possible game scenario in the original diagram? If so, you'll see how the computer must pose a question to the human player at each stage. For example:
"Does it have wings?" - for a Question object or
"Are you thinking of an Eagle?" - for an Animal object.
Now the interesting thing here is that we can write the game so that it does not need to be aware of what type of node it is dealing with at any one time. It can go around just sending an #ask (say) message to each node that it comes across and, providing we implement a suitable #ask method in each of the Animal and Question classes everything should operate just fine. As it turns out, specifying object behaviour in this way is a fundamental part of object-oriented programming. We call this Polymorphism or Polymorphic behaviour. The key thing is that different classes of object can respond to the same method in different ways. This is great because it means that the sender need not be concerned about what type of object the receiver is, merely that it responds appropriately to the message being sent.
So let's add our polymorphic (it's a great word that) #ask methods to Question and Animal. Place them in the operations category.
Question>>ask "Ask the receiver's question and continue the game appropriately depending on the answer that is received" (MessageBox confirm: self displayString caption: 'The animal you''re thinking of...') ifTrue: [ self yes ask ] ifFalse: [ self no ask ]. |
Tip: Note the double quote '' marks used to obtain a single quote character within the caption text string. You must use these to indicate to the Smalltalk compiler that the string is not actually to be terminated at this point.
In the above method we are using a MessageBox to put up a simple dialog displaying the question text together with a suitable caption and a couple of buttons to allow the player to answer yes or no. Hopefully, you can now see how the game logic follows the yes or no branches in the knowledge tree based on the player's answer to the question.
Next is the Animal>>ask method. When this is called, the computer thinks it has a sensible guess for the animal (at least it has no more questions to ask anyway). Consequently, it must ask if the guess is correct and, if so it wins the game. If not, it prompts for a new Animal to be created with the real answer and for a new Question that will distinguish this from the original guess. You'll notice that there are some new messages being sent for which we have not yet designed the methods but, don't worry, we'll get to these in just a moment.
Animal>>ask
	"Ask whether the receiver is the animal that the player is thinking of.
	If it is then the game is over. If it is not then prompt for the true answer
	and install it and a question which will distinguish this new animal from
	the receiver. This allows the game to learn."

	| newAnimal newQuestion |
	(MessageBox confirm: ('Are you thinking of ', self displayString, '?'))
		ifTrue: [ MessageBox notify: 'I guessed your animal correctly.' caption: 'GREAT, I WIN' ]
		ifFalse: [ newAnimal := Animal prompt.
			newQuestion := Question promptToDistinguish: self from: newAnimal ].
	(MessageBox confirm: 'Do you wish to play again?' caption: 'I''m, getting better all the time...')
		ifTrue: [ Animal playGame ].
|
So we saw in the last method a need to have a way of creating a new Animal by prompting for its name. Well here it is.
Animal class>>prompt "Prompt for a new animal to add to the game" | newName | [newName isNil or: [newName isEmpty]] whileTrue: [ newName := Prompter prompt: 'Tell me, what animal were you thinking of? It was a...' caption: 'So, you win...']. ^self name: newName |
As you can see the method makes use of a class called Prompter, which can be used to prompt the user to enter a text string. This is checked for validity and then used to create a new Animal instance using our original #name: method. Since the #prompt method answers a new instance, it makes sense to place it in the instance creation category. Remember too that it is a class method so you must have the Class tab clicked in the browser when you create it.
Tip: The method is complicated slightly by the fact that we have to check that Prompter does answer a valid name. If we didn't do this you'd find that the game would pretty soon go horribly wrong.
And, almost finally, we need a method to prompt for a new Question object.
Question class>>promptToDistinguish: anOldAnimal from: aNewAnimal
	"Answers an instance of the receiver (a Question) that will distinguish between
	anOldAnimal and aNewAnimal. The question should be phrased such that the
	answer is 'yes' for aNewAnimal"

	| questionText |
	[questionText isNil or: [questionText isEmpty]] whileTrue: [
		questionText := Prompter prompt: ('Now, please enter a question that will answer Yes for ',
			aNewAnimal displayString,
			' and No for ',
			anOldAnimal displayString)
			caption: 'Now, so I can learn about ', aNewAnimal displayString ].
	^self text: questionText yes: aNewAnimal no: anOldAnimal
|
Once again we have to use a Prompter and check to see that a valid response is received from the player before creating the new instance.
We are now ready, with the addition of one last method, to play our Animal game. What we need is a single method to start the game off. Just for a little fun I've left the method box below blank, so see if you can guess how the Animal>>playGame should be written. Don't worry if you can't get it, just click on the tell me how link and I'll show you how it's done.
Animal class>>playGame "Start a new Animal game" tell me how |
So now, to play the game just evaluate:
Animal playGame.
With a bit of luck you should be able to run through a few sessions with the game so that it learns some new animals. There is a pretty good chance, however, that something may have gone wrong as you worked through this chapter so here is a list of checkpoints.
Check that you have the following methods defined:
Animal class>>initialize
Animal class>>name:
Animal class>>playGame
Animal class>>prompt
Animal>>ask
Animal>>displayOn:
Animal>>name
Animal>>name:
Animal>>printOn:
Question class>> promptToDistinguish:from:
Question class>>text:yes:no:
Question>>ask
Question>>displayOn:
Question>>no
Question>>printOn:
Question>>text
Question>>text:yes:no:
Question>>yes
Also check that you have initialized the game by evaluating:
Animal initialize
Up to now you have just used the Package Browser to load existing packages into your Dolphin image. Since we have just created what is effectively a new Smalltalk application that we might wish to distribute to others, now is an opportune time to learn how to use the Package Browser to create a new package.
Open the Package Browser which will display the existing packages in your system.
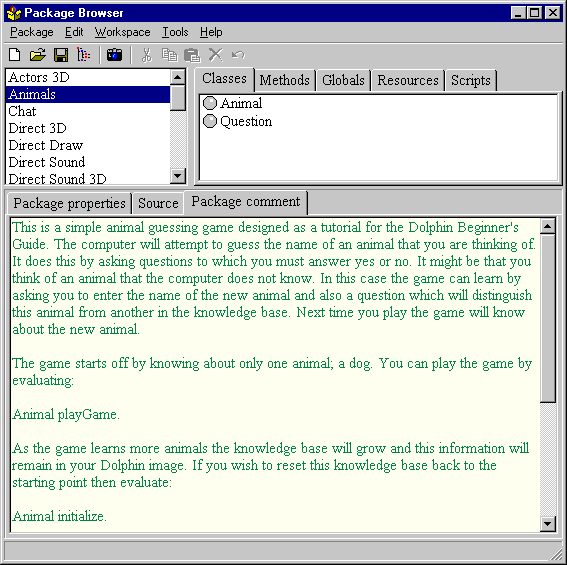
You can create a new empty package by choosing Package/New and then entering an appropriate package name. In this particular case I have chosen the name "Animals". You can now choose to add the two classes (Animal and Question) that comprise the game in one of two ways.
Tip: In fact, a package can include objects other than just classes. For instance you can include individual methods in a package by dragging the methods from the Class Hierarchy Browser and dropping them over the correct package in the Package Browser. For more details press F1 at any time within the Package Browser.
It is usual to include a comment with the package that explains what it is for and how to start using it. In order to do this select the Package comment tab and type an appropriate comment in the workspace pane at the bottom of the Package Browser. You can save the comment by choosing Workspace /Accept or by typing Ctrl+S.
After you have created a new package or changed any of its contents you must save it in order to export the classes from your image. If you are about to save the package for the first time you may want to choose a particular directory in which the package file (with .PAC extension) will reside. You can do this using the Package/Save as command. As you might expect, on subsequent saves you can just use Package/Save or the Save toolbar button to export the contents.
Should you wish to remove the Animal game from the Dolphin image you can do this by using Package/Uninstall (but you should know this already).
This chapter has been a pretty long haul but, if you have made it this far, you can relax in the knowledge that you've now created your first Smalltalk program and packaged the classes up so they can be distributed to others. Let us now recap on what you should come away with from this chapter.
This is what you have learned here:
Click here to move on to the next chapter or here to go back to the previous chapter.