Okay, let's be honest. The previous chapters have been a little dry and it's about time we had some fun. I'd like to introduce you now to a sample application for Dolphin called Playground, which we can use to consolidate some of the ideas you've learned so far.
First of all, you will need to install the Playground package into your Dolphin image. Follow the steps below to do this using the Dolphin Package Browser.
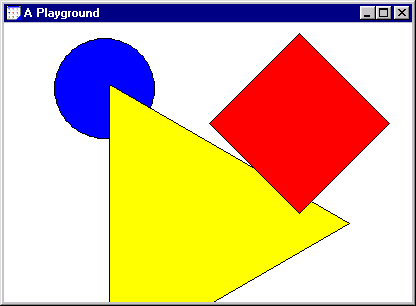
A Playground is a window to which you can add visible shape objects and then communicate with them by sending messages from a workspace. It looks like this:

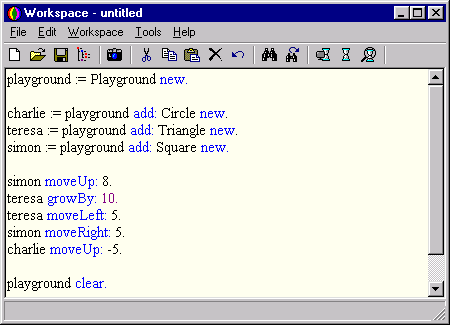
You can send messages to perform operations on the shapes, causing them to move, rotate, grow and change colour. As each operation is executed, the Playground window updates as necessary to show the new state of its shapes. You can also send messages to query and display information about the shapes and their current states. A typical dialogue in a workspace might appear as follows:

Now open another new workspace to use for the examples in this chapter..
The Playground package introduces several new classes of object into your image. One of these is the Playground class itself, which represents the functionality behind a Playground window. Let's create such a window:
playground := Playground new.
Here we send a #new message to the Playground class and this results in a Playground window being created. You'll see this appear on your screen. The Smalltalk object that represents this window will also have been assigned to the playground workspace variable. We can use this to communicate with the Playground in subsequent examples.
Tip: we don't fully introduce the idea of classes until the later chapter on Classes and Methods. However, it should be apparent from what we have just done, i.e. sending a message to a class, that classes are indeed objects too. If this sounds odd, then don't worry at this stage. Just remember: in Smalltalk, everything is an object.
Arrange the Windows on the screen so you can simultaneously see the Playground and your current workspace.
A number of additional classes, representing a variety of shapes, were also added as part of the Playground package. The ones we're interested in at the moment are Triangle, Square and Circle. Let's add one of each of these types of object to our current Playground:
teresa := playground add: Triangle new.

simon := playground add: Square new.

charlie := playground add: Circle new.
Once again, we create an object of a class (Triangle, Square, Circle etc.) by sending #new to the class. As each new shape object is created, we add it to the Playground by passing it as a parameter to an #add: message. We assign the shapes to some friendly variables so that we can "talk" to them later.
Tip: you may remember from the previous chapter that it is a convention that an #add: message will always return the object that is added as its answer.
So now we have workspace variables identifying:
"Teresa the Triangle"
"Simon the Square" and
"Charlie the Circle"
Now let's ask our shapes some questions. Evaluate the following expressions in turn and display the results using Display it (Ctrl+D).
teresa position.

simon position.

charlie position.
Note that the position of each shape is answered as a two-dimensional point. This marks the location of the center of the shape within the Playground window.
Tip: It is an oddity of the way Microsoft Windows works that y coordinates increase toward the bottom of the screen or window.
There are number of other messages you can send to the shapes to query information. Try these:
teresa sides.

simon rotation.

charlie color.

teresa radius.
All the shapes respond to a #radius message and answer the radius of their smallest enclosing circle. You'll see in a minute that the radius of a shape is what governs its overall size.
Try asking the Playground itself what shapes it contains:
playground shapes.
Teresa, Simon and Charlie will also respond to a number of messages that ask them to perform operations. Try evaluating the following expressions with Ctrl+E:
simon radius: 80.

simon rotateBy: 10.

simon moveUp: 30.

charlie color: Color magenta.

charlie growBy: 20.

teresa position: 300@100.

teresa chooseColor.

teresa
	growBy: 15;
	moveBy: 10 @ 15;
	color: Color green.
Remember that the last example is a cascaded sequence of messages so you'll need to select all the lines to evaluate them simultaneously.
Nearly all the "fun" of Smalltalk is that you can dynamically interact with the objects that you create. Why not now try some experiments on your own? Ask the Playground objects to perform some operations and then query their states. Perhaps you'll want to add some new shapes.
The following messages are available for you to play with.
| Message | Parameter | ||
| #sides | None | ||
| #sides: | An integer | ||
| #radius | None | ||
| #radius: | A number | ||
| #rotation | None | ||
| #rotation: | A number | ||
| #position | None | ||
| #position: | A point | ||
| #color | None | ||
| #color: | A color | ||
| #growBy: | A number | ||
| #shrinkBy: | A number | ||
| #rotateBy: | A number | ||
| #moveBy: | A point | ||
| #moveUp: | An integer | ||
| #moveDown: | An integer | ||
| #moveLeft: | An integer | ||
| #moveRight: | An integer | ||
| #chooseColor | None |
Remember, if you make a mistake (perhaps by providing an incorrect type of parameter), you'll most likely bring up a walkback. This protects you from doing any real damage. If this happens, simply click Terminate to continue and then try to fix the problem. If you really get into trouble you should be able to clean things up by closing the Playground window and the associated workspace and starting again.
This chapter should have firmed up some of the ideas about objects and messages that were introduced in the previous chapter. Now you have learned about:
In subsequent chapters we will reuse the Playground application to illustrate some more features of the Smalltalk language. For now, tidy up by closing your existing Playground and workspace.
Click here to move on to the next chapter or here to go back to the previous chapter.